User Management in MailVault

Generally speaking, user administration tasks can be time consuming, dull and often a waste of your technical administrator’s time. User management in MailVault is designed to change that.

A bunch of convenience features make life easy for the administrators and end-user self-service options means that your user’s can get things done, without waiting for a busy administrator to attend to them.
Understanding user roles
There are three types of users in MailVault. A user type, technically known as “Role” defines privileges and what a user is able to do in the MailVault system. There are three types of roles:

  1. User
  2. Reviewer
  3. Admin

The User role is what most end-users will be. Their actions are restricted to only their own mail,  i.e. email in which they are either a sender or recipient. They can search through their email, forward and even restore it – all without admin intervention.

The Reviewer role can do everything that a User can, with the additional privilege of being able to search through all email in the MailVault archive. This role is primarily meant for personnel with email auditing responsibilities.

The Admin role can of course do everything that User and Reviewer can – additionally it allows for administration of MailVault.

Adding users

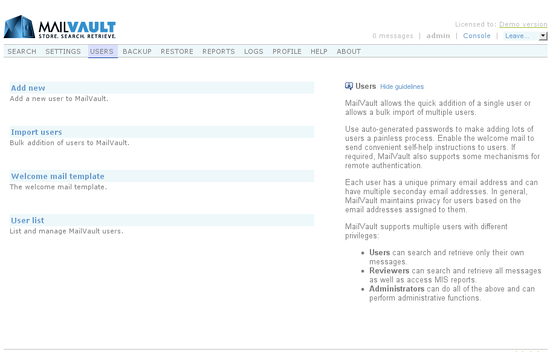
Users can be added singly or in bulk.
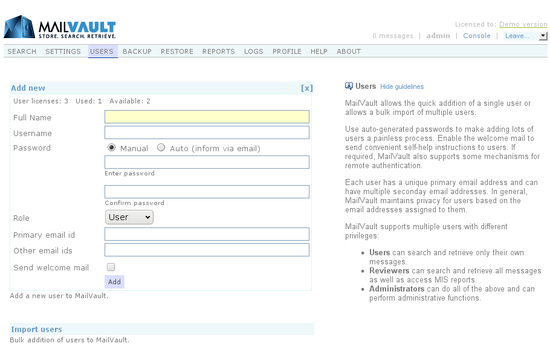
While adding a single user, the admin can specify the password in the conventional manual style or simply choose the Auto option to have MailVault send a self-activation email to the user. End of story. Each user must have a primary email id that is unique across all other users. Additionally, users may also have optional secondary email ids.

Bulk users can be imported into MailVault from various sources including CSV files, Active Directory and LDAP. MailVault can also import user’s directly from the popular PostMaster email server.

Welcome mail
An option welcome mail can be sent to user’s automatically when they are added to MailVault. This mail can carry a custom message and is a perfect way to inform employees about corporate email archiving policies, etc.

User list
The user list allows for listing, searching and modifying users. You can also export all MailVault users in a CSV format for use elsewhere.

And those are the basics of user management in MailVault.

Back up old, scattered Email into MailVault

When setting up email archiving for an organization, the recommended practice is to configure the mailserver to keep a copy of all email flowing through it into an “archive” account. MailVault picks up all the email from this account by using say, the POP3 protocol and does it’s archiving magic, after which the mail is deleted from the archive or journal account. As an ongoing process, this is a great setup since the settings are required to be just once, centrally and without any end-user changes.

However, we often hear questions like:

  • What can do I do about old email?
  • What can I do about the email of many years in my mail client?
  • Can I do anything about the old PST back-ups I have lying around?

How do I backup ALL my old email into MailVault?

To address this we present to you the MailVault Agent!

The MailVault Agent (MVA) is a little application that can transfer email from an email client into MailVault. The end-user installs the MVA on his or her computer, points it to the email client and specifies the folders from which the email needs to be transferred to MailVault.

If all goes well, the end result is that all the old email of all your users will be safely backed up into MailVault.With all the benefits of deduplication, compression and a highly searchable central storage.

After this one-shot import, you may uninstall the MailVault agent from the end users computers and continue with your mailserver based email archiving. On the other hand, if you don’t run a mail server in-house or can’t setup an email archival (journaling) account on your mailserver, you could continue to use the MVA to back up all users email into MailVault.

Currently, the MailVault Agent is available for MS Windows  only. It supports relatively recent versions of Microsoft Outlook, Outlook Express, Thunderbird and Windows Live Mail.

The MailVault Agent is available for download from the download section. Enjoy!:)

Using search results

Once you have the search results in front of you, what next?

Well view the message(s) and confirm that you have indeed located the mail you want. If you just needed to lookup some information, then you are done. However, if you want to send the mail to yourself or someone else, then read on.

At the bottom of the search page, a status section shows the number of matches to your query as well as the number of messages you have selected (by clicking on the check box next to each message summary). You can now forward the selected email in the following two ways:

1. Forward

  • Click the Forward button and in the displayed section:
  • Choose a user from the drop-down list or specify an email address to forward to.
  • Enter a subject.
  • Use the “Zip it” option to compress and reduce the size of the mail you are forwarding.
  • Send the mail by clicking forward.
  • The recipient receives mail from the MailVault admin’s email id as specified in Settings > Outbound email.

2. Forward as original

This works just like forward, except:

  • There is no “Zip it” option and the selected messages are sent out individually.
  • MailVault sends the mail to the recipient, while maintaining the orginal sender information in the email. The recipient is able to simply hit reply to respond to the original sender, making this an ideal way to restore a message or two deleted by mistake.

Note:
While an administrator is allowed to forward email to any user or email id, non-admin users have that flexibility only if they are allowed to (Settings > Core >Mail forwarding). The default setting allows non-admin users to be able to forward and forward as original only to themselves.

Delete (admin only)
An administrator is able to delete selected messages, making it useful to remove junk or other messages (like stuff from mailing lists, etc.) that may have made their way into the archive.

Do tell us if there are other ways in which you’d like to use your search results.

Searching through the MailVault email archive

Our approach to MailVault’s search functionality is a little like that of Google Search. Keep it simple and return relevant results.

Most times it should “just work”. When you need to consciously slice, dice and zoom in through the clutter, the following information and hints will help you to make the most of MailVault’s simple search.

Where do we search?

In the email headers (sender, receivers, subject, date), the entire mail body and in the content of some types of attachments (doc, pdf, html).

Search terms

The search query can be made up of single words, multiple words and phrases. Additionally these can be combined using special operators. This is better explained using a few examples.

Exact matches

Search: mail
Will match documents containing the exact word “mail” (not mails, mailing, mailvault, etc.).

Matching any of the terms

Search: mail archive
Will match documents containing the word “mail” OR the word “archive”.

Keep in mind that when we enter multiple words separated by spaces, the default behavior is to match documents that contain any of the words.

Matching all terms

Search: mail AND archive
Will match documents containing the word “mail” AND the word “archive”.

Pattern matching

By default, wildcard pattern matching does not take place. You must explicitly use the characters ? or * to match exactly a single character, or zero or more characters respectively.

Search: mail*

Matches messages containing mail, mails, mailing, mailvault, etc.

Search: mail?

This will match mail and mails, but will not match mailing and mailvault.

Please note that you cannot use ? or * as the first character of any word in your search query. Doing so, will result in an“invalid query syntax” message.

Negating a term

Search: NOT microsoft
Using NOT negates the match. So, NOT microsoft would match all email not containing the word microsoft.

Search: archiv* NOT mailvault

To locate messages that talk about email archiving and don’t mention MailVault (although why would you? 🙂

Matching phrases

Search: “John Doe
This would match all mail containing the phrase “John Doe”. You can search for phrases, by enclosing the search term within double quotes.

Grouping and building complex queries

Sometimes you may need to fine-tune your query to really zoom in on some information. You could use a combination of the tips above, as well as grouping to form a more complex query. Grouping is done using parenthesis.

Search: (John OR Jane) AND (archiv* NOT mailvault)

Something like this could be used to search for messages that must contain either John or Jane and talk of archiving, but not MailVault.

Using saved searches

If you need to run the same complex searches often, it will soon get tedious to keep typing out long queries. That’s where “Save search” comes in. Once you have fine-tuned your search and gotten the results you want, you can say “Save search”, give it a name and the next time around access it from “My searches”, right next to the search box.

Note: The search terms themselves are case-insensitive (apple, Apple, APPLE will all produce the same results), but the logical operators are case sensitive. You must use OR, AND, NOT in upper-case.

For the occasional times, that you may need to use additional criteria and filters, head over to the “Advanced search” page and use the point and click functionality to build your search query.

May you find the information you seek!

First steps after installing MailVault

There is a book that goes by the name of “What to say, after saying Hello” (or something like that!). A WHOLE BOOK? I guess human beings are complex creatures.

Fortunately, interacting with MailVault isn’t anywhere near as complex. Inspite of all it’s power and flexibility, it is simple to use. For a new setup, on-screen instructions and hints guide through the few basic steps required to get going.

Here is the 1-2-3-4 of configuring MailVault once you’ve installed it.

Logging in

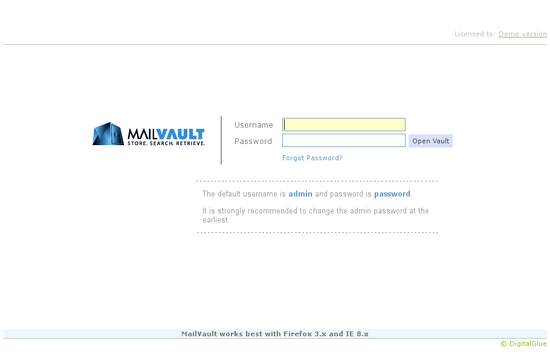
The preset username and password for MailVault is “admin” and “password”. A notice on the login page displays these details and will stay visible on the login page until the admin password is changed.

MailVault Login Screen

Needless to say, it is strongly recommended to change the admin password at the earliest.

Basic configuration

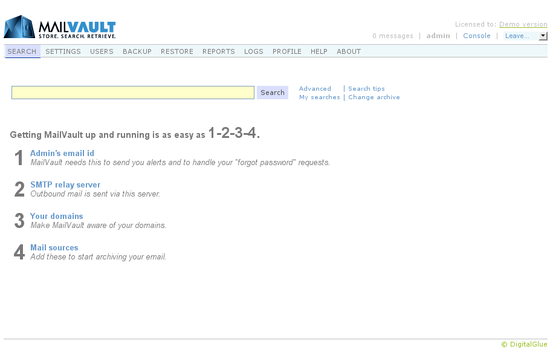
On logging in, the main page (which happens to be the Search page) of the application is displayed. Obviously there is no point in executing a Search right now… 🙂

In the area under the search box, are listed the recommended steps for completing the basic configuration. As you complete each one, the line turns from blue to grey.

MailVault Basic Configuration

Let’s take them in order:

1. Admin’s email id

Specify a valid email-id for the administrator. This will be used as the sender email-id for mail originating from MailVault (alerts, search result forwarding, etc.). Additionally, in case you forget your password, this will be needed to reset your password.

To set the email id, go to Users > User list and edit the Administrator entry.

2. SMTP relay server

MailVault needs a SMTP server through which it can relay mail. Normally this will be your corporate email server.

To set this, go to Settings > Outbound email and fill the relevant information.

3. Your domains

These are used to identify your corporate email from other external mail and can be set at Settings > Core > My domains.

4. Mail sources

MailVault acquires mail using mail sources. Many types of mail sources are supported, but the most commonly used one is POP3.

Head over to Settings > Mail Sources > Retrieve mail from and click on “Add new”.

Once all of these items are configured, MailVault will no longer display these hints on the main Search page.

Basically that’s it. MailVault will now begin the process of archiving your email.

Other stuff

Now while MailVault does it’s stuff you can go ahead and do other things – like adding some users. Feel free to wander through the various settings and check out the available options. If you don’t feel the need to tinker or customize, no worries – most settings in MailVault have sane default values.

All Settings pages have a “guidelines area” on the right hand side which informs you about the purpose of the page’s settings. Additionally, every setting section on a page has it’s own little “help line” at it’s bottom.

Finally, if you really need to you, can request assistance online at the MailVault site; but we assure you, you won’t need an entire book on what to do after installing MailVault! 🙂

Feel free to tell us about things you liked, didn’t like and how we can make your MailVault experience even better…

Installing MailVault

Note: For now, these instructions are for Microsoft Windows platforms only.

Installing and setting up MailVault is easy.

1. Download

Download MailVault and save the installable in an appropriate location on your disk.

2. Install

Double-click the installable to start the installation process. Follow the instructions to complete the installation and to create a shortcut MailVault icon on the desktop. The default installation location isC:\Program Files\DigitalGlue\MailVault.

3. Initial configuration

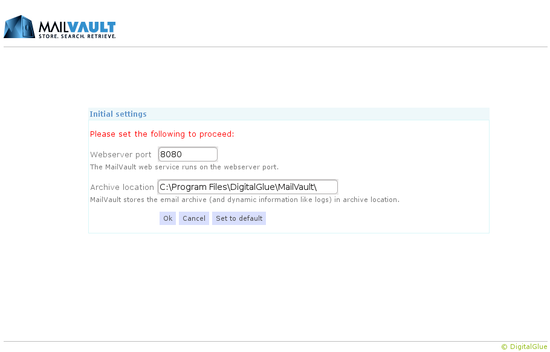
Start MailVault by double-clicking it’s shortcut icon. On it’s first startup, MailVault needs two pieces of information to be confirmed by you:

  1. The port on which to run it’s webserver (default is 8080)
  2. The location of your mail archive, logs, and other dynamic data (default is under the installed location)
Initial Settings for MailVault

Our advice would be to keep the archive location away from and out of the program installation location – preferably on a separate partition, where there is enough space to hold all the mail you plan to archive.

Once these settings are confirmed, MailVault starts up into normal operation. Simple on-screen hints are available to assist you in completing the basic recommended configuration.

MailVault is now running in demo mode (as indicated on the upper right corner of your screen). In demo mode, more or less all the functionality is available – the limitations being that you will be able to create only two other users and MailVault will archive up to 1000 messages only.

4. License deployment

If you have a license file (evaluation or commercial) – normally emailed to you separately – you can deploy it by copying it into the configuration folder under the MailVault location (in this example under C:\Program Files\DigitalGlue\MailVault\config). You must ensure that the license file is named license.

Restart MailVault. The Demo version on the top right corner of your browser, should now be replaced by your company name.

Test, play, enjoy!