How to backup and archive email into MailVault

MailVault can backup and archive email in a number of ways.

It can “pull” mail from corporate mail servers and public mail servers, parse multiple mailbox formats, pick up randomly scattered mail from the filesystem and read messages from selected email clients. MailVault can also accept email “pushed” to it via the SMTP protocol.

In cases where there is no mail server running, the MailVault Agent installed on remote machines enables users to backup email from their email clients into MailVault.
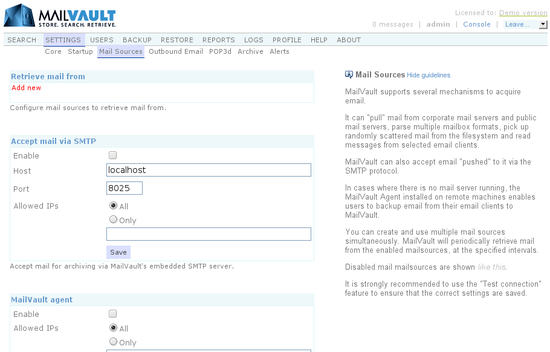
Mail sources in MailVault

For those familiar with email, MailVault’s capabilities include:

  • Support for network oriented protocols like POP3, IMAP and SMTP thus ensuring connectivity with any standard corporate email server (Microsoft Exchange, Lotus Notes, Postfix, Qmail, Sendmail, PostMaster, MDaemon, VPOP3, etc.)
  • Support for filesystem based mail sources like Unix mbox, Maildir, regular directories with individual email files (.eml / standard RFC 822 format)
  • Convenient wrappers for public email proividers like GMail, Yahoo, Rediffmail
  • Can read email from email clients like Microsoft Outlook, Outlook Express, Windows Mail, Windows Live Mail and Thunderbird
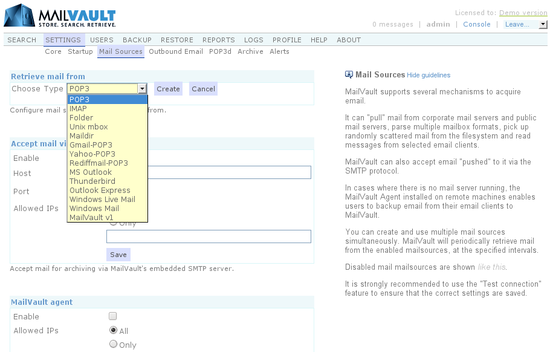
Types of Mail Sources

Inspite of all this power and flexibility, using MailVault is quite simple. Let’s look at setting up a mail source.

Configuring a mail source (Generic steps)

For the MailVault administrator, setting up a mail source simply boils down to the following generic steps:

  1. Go to Settings > Mail Sources
  2. To add a new mail source, click “Add new”
  3. From the drop down list, choose a mail source and press “Create”
  4. Configure the mail source specific settings
  5. Press Test to check if the settings are correct
  6. If all is well, press Save

That’s it. MailVault now begins the backup and archive process.

Configuring a POP3 mail source

Most email servers support copying or journaling all email that flows through them into a mailbox, which is POP3 enabled. MailVault can then periodically pickup email from this ‘archive’ mailbox using the POP3 protocol. This makes the POP3 mail source one of the most popular and recommended ways of using MailVault with your mail server. Let’s see how a POP3mail source is configured.

  • Go to Settings > Mail Sources
  • Click on Add new
  • Choose POP3 from the drop down
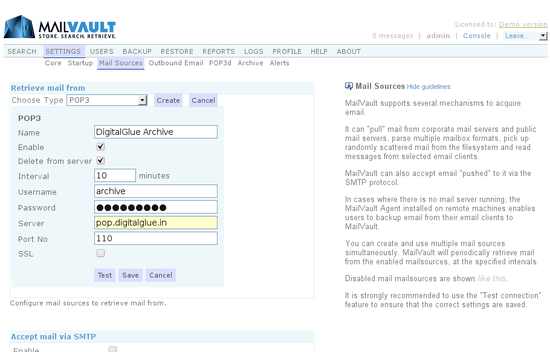
Configuring a POP3 mail source

With reference to the image above:

  1. Make the name an easy identifier (espcially if you are going to use multiple mail sources)
  2. Ensure the mail source is enabled (default is ON)
  3. We’d like to delete messages from the POP3 box once retrieved into MailVault
  4. Poll the mail source every 10 minutes
  5. Enter the POP3 mailbox username
  6. Enter the POP3 mailbox password
  7. Provide the host name
  8. Check the port is correct (default is 110)

As a good practice, at this point we recommend highly that you press the Test button. Ensure that you get a “Connection successful” message and then save the mail source.

Get a cup of coffee, sit back and relax while MailVault archives your email… 🙂

Restoring Email from the MailVault archive

A good archiving solution does a good job of backing up your email. An excellent archiving solution does an even better job in letting you retrieve and restore your email.

Let’s show you why MailVault is excellent! 🙂

So you have millions of messages in your MailVault archive. There are basically two ways to retrieve the messages you are interested in.

One-off email retrieval

For one-off information search requirements, you can use the blazingly fast search to locate the message(s) you want. These can then be viewed or forwarded as explained in earlier posts. Being able to retrieve email from within search results can be a very useful feature indeed.

Restoring a user’s email

Now let’s say a user’s email box gets corrupted or his hard disk crashes and he needs his email to be restored. We can restore email for any user, having a single or multiple email ids, over any time range and via multiple methods.

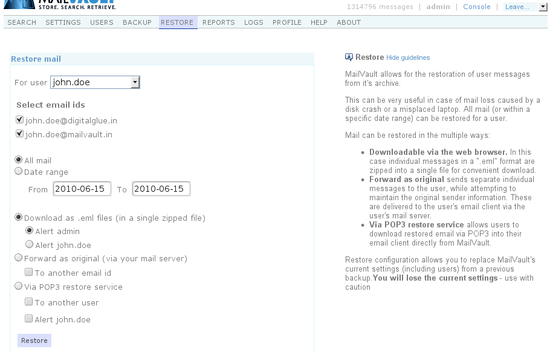
Let’s assume the MailVault administrator is performing the restore. Here’s how easy it is:

  1. Select the user
  2. Choose the user’s email ids that need to be included in the restore
  3. Choose a time range or simply select ‘All mail’
  4. Select how you want the email to be restored

Hit the Restore button and MailVault will do a quick computation and inform you how many messages will be restored. This number is based on the criteria you selected in steps 1-3. You may now choose to continue with the restore by selecting the email restore mode or you could safely abort the restore at this point (if you just wanted to see how many messages would be restored, for instance).

Understanding email restore modes

For complete flexibility, MailVault supports multiple restore methods:

1. Download as .eml files (in a single zipped file)

In this mode the restored email is basically one message per file (each file has a .eml extension), which are all compressed and zipped together into a single file downloadable from the browser itself.

This mode is useful if you need to submit the mail as part of an audit exercise to someone, or when you want the email in a mail-client neutral format. This is ideally suited for a relatively small number of messages.

2. Forward as original (via your mail server)

In this mode the email to be restored is sent back to the user’s primary email address via your corporate email server. The user retrieves email into his email client as usual. The mail is “forwarded as original”, meaning that the orginal sender and date information is preserved – which means the user can apply filters to sort the incoming mail in his email client.

This method is very useful for restoring a remote user’s email (especially if the remote users have no direct access to MailVault). This mode can be used to restore a large number of messages. However keep in mind that if the restore job is large, your mail server will be processing a lot of ‘restored messages’ in addition to it’s regular workload. Hence, for large restore jobs it may be prudent to start the restore at times when the mail server loads are relatively low (like outside work hours).

3. Via POP3 restore service

In this mode the email is restored from MailVault directly into the user’s email client using the POP3 protocol. The user points his email client at MailVault using his MailVault username and password and pulls his mail out. As usual, mail client filters can sort the incoming mail into different folders.

In addition to being able to handle a large amount of email, this mode causes no extra traffic or load on the corporate mail server.

Other settings

Some of the modes have optional alert options wherein MailVault can send out alerts when the restore process is ready. Additionally, some modes support restoring to a different email id than that of the user whose mail is being restored. These are primarily useful for monitoring and audit purposes.

Self service for end users

End user’s can restore email for themselves. The only difference is that they don’t have the option of selecting a user. They can only choose from their own email ids, the time period and the restore mode.

Here’s hoping you never lose your email. But if you do, relax and let MailVault help get you up and running. Easily and speedily!